
Laying cables across a live traffic surface without proper protection is one of the most avoidable causes of equipment damage, trip hazards, and vehicle incidents on outdoor worksites, event venues, construction zones, and commercial facilities. A rubber cable protector ramp solves this problem by creating a stable, drive-over housing that keeps cables safely contained beneath a load-bearing rubber body while allowing vehicles and pedestrians to cross without disruption. Installing one on asphalt requires a specific approach that differs from concrete or indoor installations, and getting the process right from surface preparation through to final anchoring determines whether the ramp performs reliably or shifts, rocks, and fails under load.
This guide covers the complete process for installing rubber cable protector ramps on asphalt surfaces, from site assessment and tool selection through surface preparation, ramp positioning, cable routing, anchoring, and post-installation checks. It applies to both temporary setups for events and productions and semi-permanent installations on parking lots, driveways, and outdoor facility access routes.
Understanding the Product Before You Install
1. How Rubber Cable Protector Ramps Are Constructed
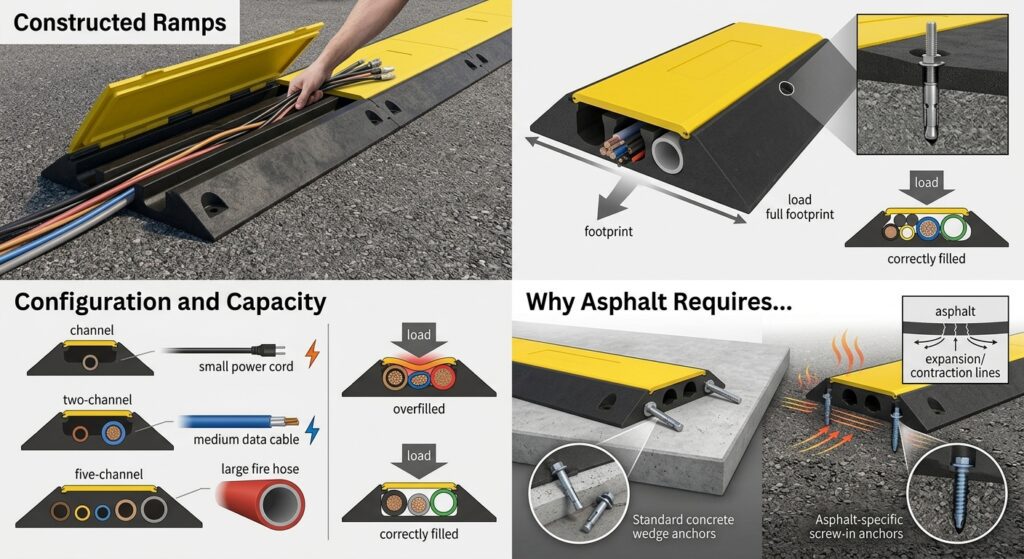
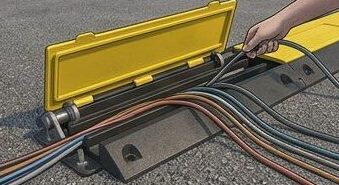
A rubber cable protector ramp is a modular, heavy-duty rubber unit consisting of a base body with one or more internal channels and a hinged or removable lid that allows cables to be inserted and secured. The base body sits directly on the ground surface, providing the ramp profile that vehicles and pedestrians travel over. The internal channels protect the cables from compression under vehicle load, with the rubber body distributing the weight across the full footprint of the ramp rather than allowing it to concentrate on the cable itself.
Commercial-grade rubber cable protector ramps for outdoor asphalt use are typically manufactured from recycled rubber or EPDM compounds, with load ratings ranging from 10,000 to 33,000 pounds per axle depending on the product specification. The modular design allows multiple sections to be connected end-to-end to span wider road crossings or longer cable runs. Pre-drilled mounting holes in the base allow the ramp to be anchored to the surface using expansion bolts or asphalt anchors, converting a loose-laid unit into a fixed installation.
2. Channel Configuration and Cable Capacity
Rubber cable protector ramps are available in single-channel, two-channel, three-channel, and five-channel configurations. Each channel is designed to house one or more cables, cords, or hoses up to a specified diameter, with channel dimensions typically ranging from 1.2 by 1.2 inches for light-duty models up to 4 by 3 inches for heavy-duty industrial versions.
For asphalt installations carrying mixed cable types, the correct channel configuration should be selected before ordering. Routing power cables and data cables through separate channels reduces the risk of electromagnetic interference and makes the installation easier to manage, identify, and reconfigure if cable runs change. Channels should never be overfilled. A cable that is forced into a channel with insufficient clearance is not properly protected, and the compression load from vehicle traffic will degrade both the cable sheath and the channel wall over time.
3. Why Asphalt Requires a Different Approach
Asphalt is a flexible, thermoplastic surface that expands and contracts with temperature change and compresses under repeated load in ways that concrete does not. This behavior affects both the anchoring method and the surface preparation requirements for rubber cable protector ramp installation on asphalt. Standard concrete wedge anchors that rely on a rigid, non-compressible substrate will not hold reliably in asphalt. The surface must be assessed for structural integrity before any permanent anchoring is attempted, and the asphalt temperature at the time of installation affects both drilling behavior and adhesive performance.
Tools and Materials Required
What to Prepare Before You Begin
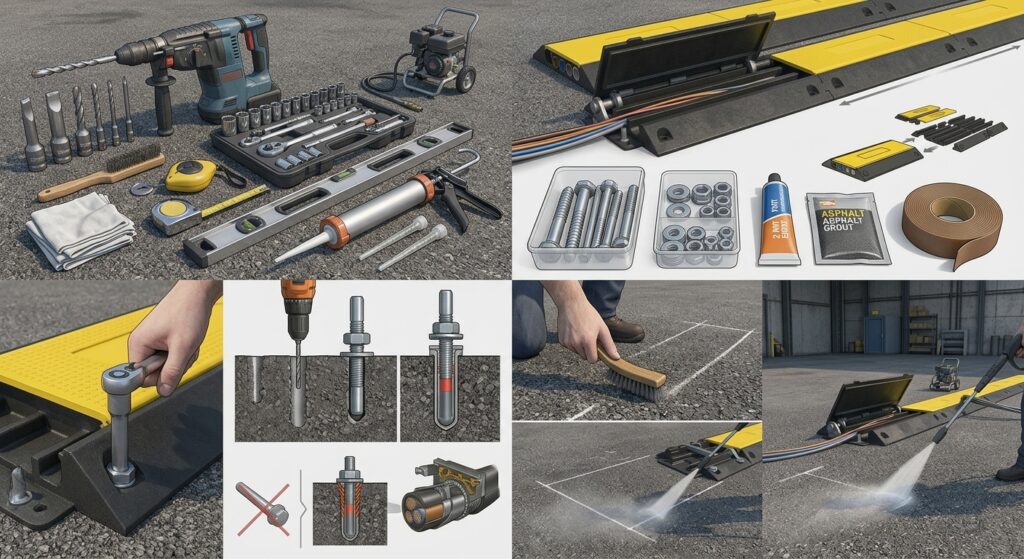
A successful rubber cable protector ramp installation on asphalt requires a defined set of tools and materials gathered in advance. Attempting the installation without the correct anchoring hardware for an asphalt substrate is the most common cause of installation failure on outdoor surfaces.
The tools required are a hammer drill with masonry bits sized to the anchor specification, a socket wrench set, a tape measure, a chalk line or marking tool, a wire brush or stiff broom, a pressure washer or hose for surface cleaning, and a level. For permanent installations using epoxy-set asphalt anchors, a caulking gun for applying two-part epoxy adhesive is also required, along with mixing nozzles and clean rags for surface preparation.
The materials required are the rubber cable protector ramp sections in the specified channel configuration and quantity, asphalt-rated expansion anchors or epoxy anchors in the diameter and length specified for the ramp’s mounting hole size, washers and nuts to match the anchor bolts, and a fast-setting asphalt-compatible grout or two-part epoxy if epoxy anchors are being used. For temporary installations where mechanical anchoring is not required, double-sided outdoor rubber adhesive tape rated for asphalt and vehicle traffic provides a supplementary fixing option alongside the ramp’s own weight.
Step-by-Step Installation Process
1. Site Assessment and Layout Planning
Before any physical work begins, assess the installation site for surface condition, drainage, and traffic flow. The asphalt surface where the ramp will be installed must be structurally sound. Cracked, crumbling, or delaminating asphalt does not provide a stable substrate for anchor bolts and will allow the ramp to rock and shift under load regardless of the fixing method used. Areas of asphalt with visible alligator cracking, soft spots, or active surface distress should be repaired before the ramp is installed.
Check the proposed installation line for underground services before drilling. On commercial asphalt surfaces such as parking lots and access roads, buried cables, drainage pipes, and service conduits may run beneath the surface at depths that could be reached by an anchor bolt. Contact the site owner or facilities manager to obtain a services drawing or arrange a CAT scan of the surface before drilling.
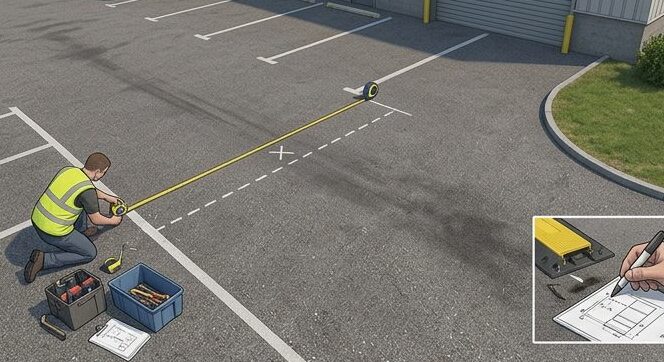
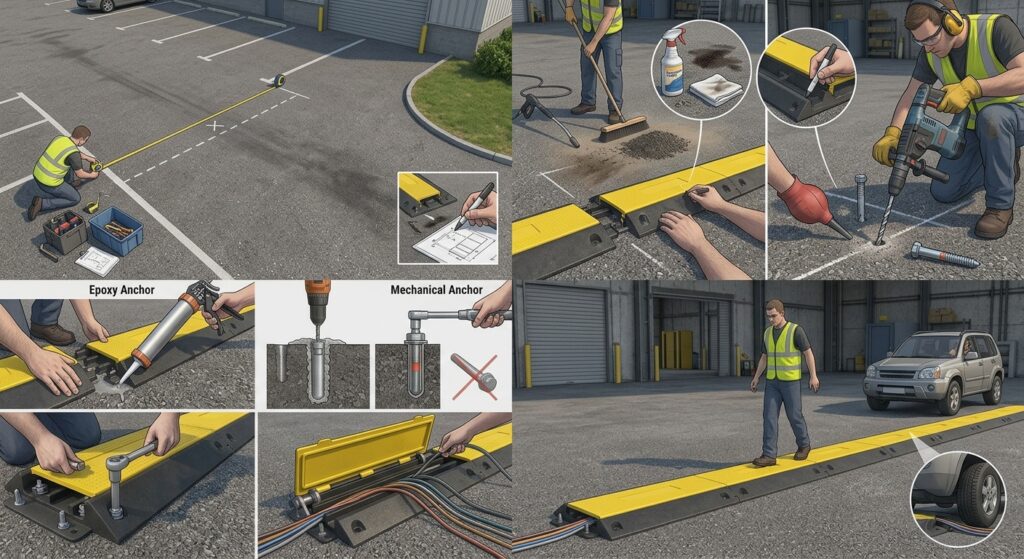
Establish the exact position of the ramp using a tape measure and chalk line. The ramp should be positioned perpendicular to the direction of vehicle travel, centered on the lane or crossing point it is protecting. For modular multi-section installations, lay all sections out in position before connecting them to confirm that the total length aligns correctly with the lane width and that the end caps or terminal sections are correctly positioned at each edge of the carriageway.
2. Surface Cleaning and Preparation
Surface preparation is the most important factor in the long-term stability of a rubber cable protector ramp installation on asphalt. A clean, dry, debris-free surface is required for both mechanical anchoring and any adhesive fixing to perform correctly.
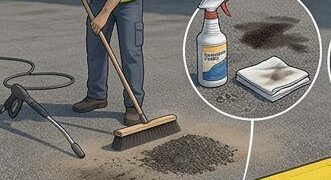
Sweep the entire installation area thoroughly with a stiff broom to remove loose grit, gravel, and debris. If the surface is contaminated with oil, fuel, or hydraulic fluid, clean it with a degreasing agent and rinse thoroughly with water, allowing the surface to dry completely before proceeding. Oil contamination on asphalt prevents adhesive bonding and can cause anchor grout to cure poorly. For surfaces with heavy soiling, a pressure wash followed by a minimum of two hours of drying time in dry weather conditions is the appropriate preparation standard.
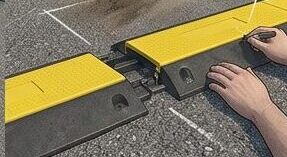
Once the surface is clean and dry, mark the anchor hole positions through the pre-drilled mounting holes in the ramp base using a marker or chalk. Remove the ramp sections temporarily to allow clear access to the marked drilling positions.
3. Connecting Modular Sections
Where the installation requires multiple ramp sections connected end-to-end, assemble and connect the sections before anchoring any of them to the surface. Most modular rubber cable protector ramp systems use interlocking tabs and slots, connecting bolts, or integrated coupling profiles that align the sections and lock them together.
Lay the first section in position and align the second section alongside it with the interlocking profile engaged. Press the sections together firmly and confirm that the connection is flush and the ramp profile is continuous across the joint with no step or gap. A gap at a section joint creates a point of weakness where vehicle tire pressure concentrates and where cables can be pinched if they are not routed entirely within the channel. Tighten the connecting bolts if the system uses mechanical fasteners at section joints, and check that the assembled unit lies flat on the surface with no section rocking or lifting at the corners.
4. Drilling Anchor Holes in Asphalt
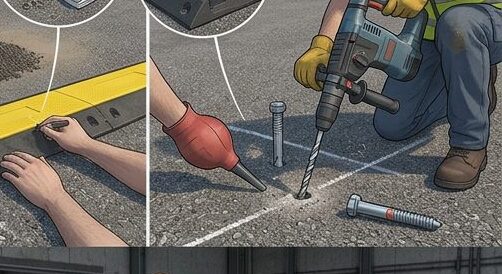
With the ramp sections connected and the anchor hole positions marked on the asphalt surface, drill each hole using a hammer drill set to rotary-hammer mode with a masonry bit sized to the anchor specification. The correct drill bit diameter is the outside diameter of the anchor sleeve, not the bolt diameter. Check the anchor manufacturer’s specification before drilling.
Drill each hole to the depth specified for the anchor type, typically 3 to 4 inches for asphalt anchor applications. Keep the drill perpendicular to the surface throughout each hole. An angled hole produces an angled anchor that does not seat correctly and will pull out under lateral load from vehicle impact on the ramp edge. Clear each hole of drilling debris using a bulb blower or compressed air before inserting the anchor.
Asphalt drilling behavior changes significantly with surface temperature. In hot weather above 30 degrees Celsius, asphalt softens and the bit may wander or the hole walls may close slightly after drilling. In cold conditions below 5 degrees Celsius, asphalt becomes brittle and may chip or crack at the hole edge. In either extreme, reduce drilling speed and clear the hole frequently during drilling to prevent bit binding.
5. Installing Asphalt Anchors
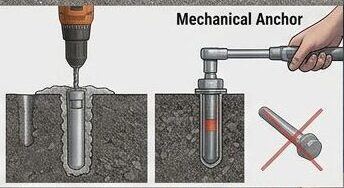
For semi-permanent and permanent rubber cable protector ramp installations on asphalt, epoxy-set anchors provide the most reliable holding strength. Insert the anchor sleeve into the drilled hole until it sits flush with the asphalt surface. Mix the two-part epoxy grout according to the manufacturer’s instructions and fill the hole steadily until the epoxy slightly overflows the top of the anchor sleeve. Push the anchor body firmly into the wet epoxy and hold it flush with the surface for the dwell time specified in the product instructions, typically 30 to 60 seconds. Allow the epoxy to cure fully before applying any load to the anchor. Fast-setting epoxy formulations designed for outdoor use typically reach working strength within 30 to 60 minutes at temperatures above 15 degrees Celsius, with full cure at 24 hours.
For temporary or semi-temporary installations where the ramp will be removed seasonally or after a defined project period, mechanical expansion anchors designed for asphalt provide adequate holding strength without epoxy bonding and can be removed and reinstalled. Insert the anchor into the drilled hole and tighten the bolt to the torque specified in the product instructions. Do not overtighten mechanical anchors in asphalt, as the material will compress around the anchor sleeve and reduce the expansion force that provides the holding mechanism.
6. Positioning and Bolting Down the Ramp
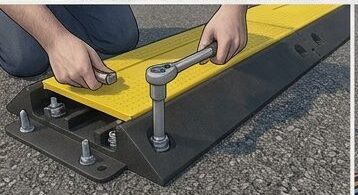
With all anchor bolts seated and the epoxy cured if epoxy anchors were used, position the assembled ramp sections over the anchor points and align the ramp mounting holes with the protruding bolt shafts. Place a washer over each bolt shaft before threading the nut. Tighten each nut to finger-tight initially to allow the ramp to be repositioned if the alignment is not exact, then tighten fully in a cross pattern, working from the center of the ramp outward to the end sections. This sequence distributes clamping force evenly across the ramp base and prevents one end from lifting as the opposite end is tightened.
Check the installed ramp for stability by pressing down firmly on each corner and on the center of each section. No section should rock, lift, or flex significantly under hand pressure. If any section is unstable, check the corresponding anchor bolt for secure seating and confirm that the ramp base is making full contact with the asphalt surface beneath it. A ramp that bridges a surface irregularity rather than sitting flat on the asphalt will concentrate vehicle load at the contact points rather than distributing it across the full base, accelerating wear and loosening the anchor fixings over time.
7. Routing and Securing Cables in the Channels
With the ramp secured to the surface, open the hinged lid or remove the top cover of each channel section and route the cables into the channels one at a time. The most sensitive cables, typically low-voltage data or signal cables, should be placed toward the hinge side of the channel where they are furthest from the compression zone at the top of the channel when the lid is closed. Power cables carrying higher currents can be routed in the outer channel position.
Do not route cables by pulling them through the channel from one end. Lay them in from the open lid, working from one end of the ramp to the other, keeping the cable lying naturally without tension or forced bends within the channel. A cable under tension within a channel is not properly protected because the tensile force creates a pressure point against the channel wall that concentrates rather than distributes the load from vehicle traffic.
Close and secure the lid of each channel section according to the product design: hinged lids snap closed under pressure or are secured with the integrated grip strip, while removable lid sections are pressed into the retaining channel and confirmed seated before the installation is considered complete.
8. Final Checks Before Opening to Traffic
Before the installation is opened to vehicle and pedestrian traffic, carry out a final inspection of the complete assembly. Confirm that every anchor bolt is tightened, every section connection is secure, and every channel lid is fully closed and seated along its entire length. Check that the cable entry and exit points at each end of the ramp are dressed neatly and that cables are not pinched or kinked at the transition between the open surface and the channel entry.
Walk the full length of the ramp pressing down firmly on each section to confirm stability. Then drive a light vehicle over the ramp at low speed and inspect the assembly immediately afterward for any movement, loosening, or distortion. Make any adjustments to anchor tightness or section alignment before the installation is opened to normal traffic flow.
Post-Installation Maintenance on Asphalt
1. Routine Inspection Schedule
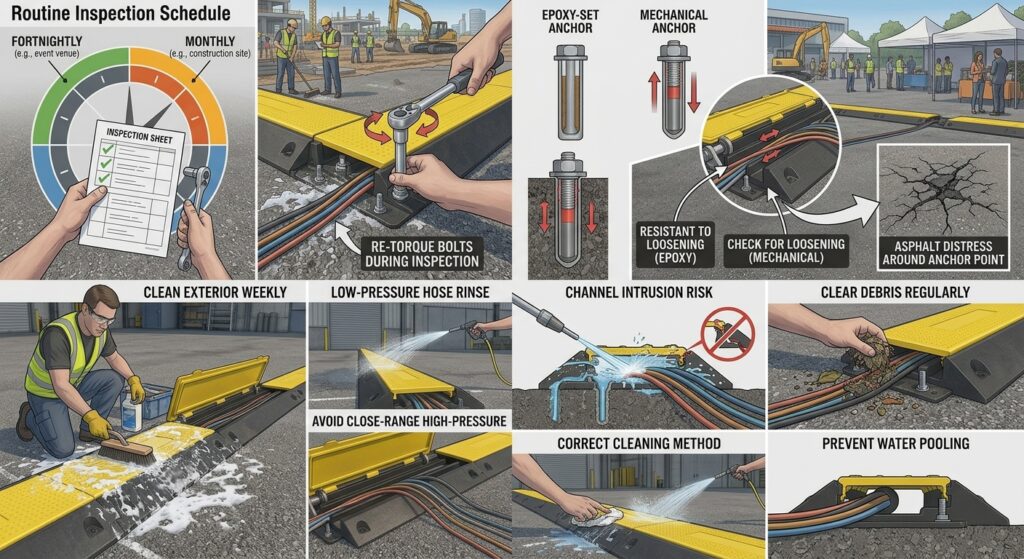
Rubber cable protector ramps installed on asphalt surfaces require periodic inspection to maintain safe and effective performance. On active outdoor sites, a monthly visual inspection of anchor bolt tightness, section connection integrity, and channel lid condition is the minimum recommended frequency. In high-traffic locations such as construction site access points or permanent outdoor event venues, a fortnightly inspection is more appropriate.
Asphalt movement caused by temperature cycling and traffic loading gradually loosens mechanical anchor fixings over time. A ramp that was firmly anchored at installation will develop minor movement in the anchor bolts within a few months on a busy surface and should be re-torqued as part of the routine inspection programme. Epoxy-set anchors are significantly more resistant to this loosening but should still be checked for any signs of asphalt distress around the anchor point that might indicate surface deterioration beneath the ramp.
2. Cleaning and Channel Maintenance
Clean the exterior of installed rubber cable protector ramps weekly using a stiff brush and mild soapy water or a low-pressure hose rinse. Avoid high-pressure washing at close range directly into the channel lid joints, as sustained high-pressure water intrusion can damage cables within the channels and degrade the lid retention mechanism. Debris accumulation in the channel entry points at each end of the ramp should be cleared regularly to prevent water pooling and to ensure cable entry and exit points remain unobstructed.
Conclusion: A Correct Installation Protects Both Cables and People
A rubber cable protector ramp installed correctly on asphalt is a long-serving, low-maintenance asset that protects cables from vehicle damage, prevents trip hazards for pedestrians, and complies with site safety and cable management standards at outdoor locations. The difference between an installation that holds reliably for years and one that fails within weeks comes down to surface preparation, the correct anchor type for the asphalt substrate, and the attention given to the final assembly and cable routing steps.
For procurement teams, site managers, and safety officers sourcing rubber cable protector ramps for outdoor asphalt installations, the product specification matters as much as the installation process. A ramp with an adequate load rating for the heaviest vehicle expected on the site, the correct channel configuration for the cable types being managed, and pre-drilled mounting holes sized for asphalt-rated anchors will install cleanly and perform reliably when the process described in this guide is followed.
The ramp that is correctly anchored and properly loaded on day one is the ramp that is still performing on day one thousand.
Looking for heavy-duty rubber cable protector ramps rated for outdoor asphalt installation and vehicle traffic? At JessuBond, we supply commercial-grade cable protection ramps with flexible MOQ and consistent lead times for project and bulk procurement. Contact us here.