
Installing rubber speed bumps in commercial facilities requires technical knowledge, proper planning, and attention to detail that distinguish professional installations delivering reliable long-term performance from inadequate implementations that fail prematurely or create safety hazards rather than solving them. Facility managers, maintenance directors, and property operations personnel responsible for speed bump installation projects must understand site assessment procedures, surface preparation requirements, installation techniques, and quality verification methods that ensure deployments meet safety objectives while complying with accessibility standards and delivering the multi-year service lives that investment justification assumes. This comprehensive installation guide provides the practical knowledge necessary for successful rubber speed bump projects in commercial parking lots, internal roadways, and facility circulation routes.
Pre-Installation Planning and Site Assessment
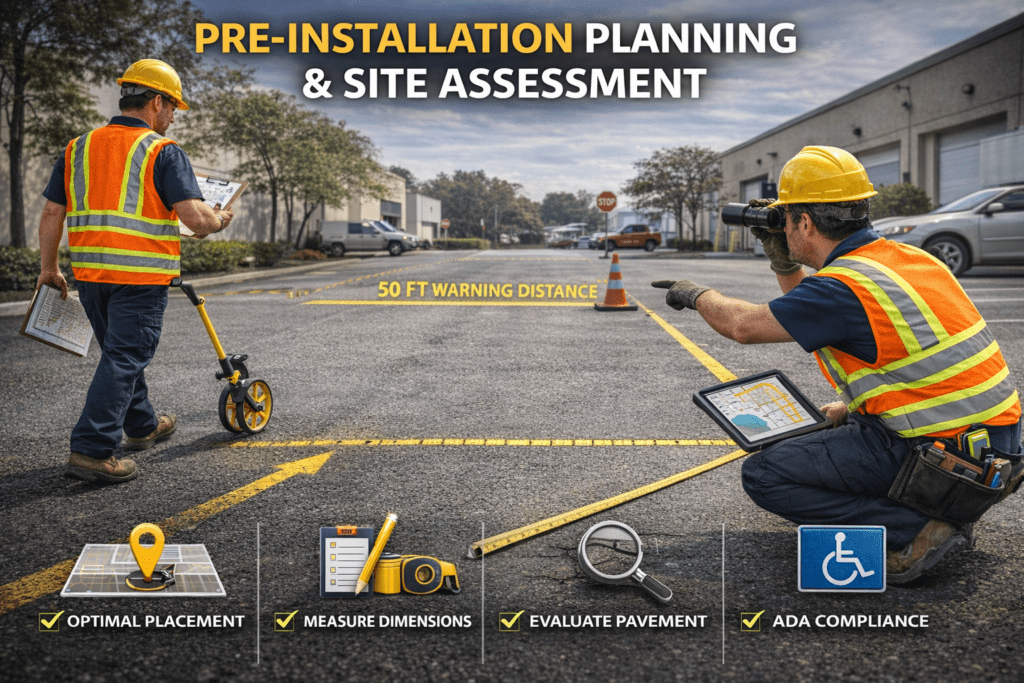
Successful installations begin with thorough site assessment identifying optimal placement locations, measuring precise installation dimensions, evaluating substrate conditions, and planning logistics that minimize operational disruptions. Site assessment should involve walking or driving typical traffic routes while observing actual vehicle behavior, identifying locations where speeds exceed safe limits, and determining where speed reduction would provide maximum safety benefit. This observational assessment often reveals that intuitive placement locations don’t always align with actual traffic patterns or hazards, making field verification essential rather than relying solely on facility maps or theoretical analysis.
Placement location decisions should account for advance warning distances allowing drivers to perceive speed bumps, recognize appropriate response, and decelerate comfortably rather than braking abruptly in ways that create rear-end collision risks or passenger discomfort. The specific warning distance depends on approach speeds and sight lines, with higher-speed areas requiring greater advance visibility than slow-speed parking lot aisles. General guidance suggests positioning speed bumps at least 50-100 feet from stop signs, intersections, or other features requiring driver attention to avoid overwhelming motorists with simultaneous demands that divided attention cannot adequately address.
Substrate evaluation determines whether existing pavement provides adequate foundation for rubber speed bump installation or requires repairs before mounting can proceed. Inspectors should identify potholes, significant cracking, surface deterioration, or drainage issues that might compromise installation quality or accelerate speed bump degradation through water infiltration beneath mounted units. Minor surface imperfections typically don’t prevent installation, though significant defects warrant repair before speed bump mounting to ensure secure attachment and proper drainage that prevents water accumulation contributing to premature failure.
Americans with Disabilities Act compliance assessment verifies that proposed installations don’t create accessibility barriers or that any unavoidable impacts receive appropriate accommodation through alternative accessible routes. While speed bumps serving legitimate safety purposes generally satisfy ADA requirements when properly designed and installed, organizations should document compliance considerations and potentially consult accessibility specialists if questions arise about specific installation impacts on facility accessibility. This proactive compliance verification prevents expensive remediation if accessibility complaints emerge after installations complete.
Tools, Materials, and Equipment Requirements
Professional rubber speed bump installation requires specific tools and materials that ensure secure mounting, proper alignment, and finished quality meeting safety and aesthetic standards. Core equipment includes power drills with concrete and masonry bits appropriate for substrate types being penetrated, torque wrenches for achieving specified fastener tightness, chalk lines or paint markers for layout, measuring tapes for dimensional verification, and brooms or power washers for surface preparation. Organizations lacking these tools should evaluate whether purchasing equipment justifies anticipated installation frequency or whether contracting professional installers proves more economical.
Fastener selection critically affects installation longevity and security, with appropriate hardware varying based on substrate composition. Asphalt installations typically utilize lag bolts or specialized asphalt anchors designed for bituminous substrates, while concrete substrates require expansion anchors or wedge anchors providing mechanical grip in harder materials. Fastener specifications should match or exceed manufacturer recommendations regarding length, diameter, and material grade, as undersized or inferior hardware represents false economy creating premature failures requiring complete reinstallation. Stainless steel or galvanized fasteners resist corrosion extending service life in outdoor environments where moisture exposure accelerates untreated steel degradation.
Supplementary materials including surface sealants, reflective tape, and warning signage enhance installation quality and safety performance beyond what basic mounting provides. Asphalt sealant applied around speed bump edges prevents water infiltration beneath units while creating finished appearance. Reflective tape applied to speed bump surfaces or supplementary pavement markings improve nighttime visibility beyond the reflective striping that quality rubber speed bumps include as manufactured features. Warning signage positioned in advance of speed bumps provides redundant notification helping ensure adequate driver awareness particularly during initial post-installation periods when motorists haven’t yet learned about new traffic calming devices.
Safety equipment including traffic cones, warning signs, and potentially flaggers protects installation crews and directs traffic around active work zones. Even installations in low-traffic areas warrant basic traffic control preventing vehicle intrusions into work zones that could injure workers or damage equipment. Organizations should review OSHA requirements for work zone traffic control ensuring installations comply with applicable workplace safety standards rather than assuming informal safety measures adequately protect workers from traffic hazards.
Surface Preparation and Installation Layout
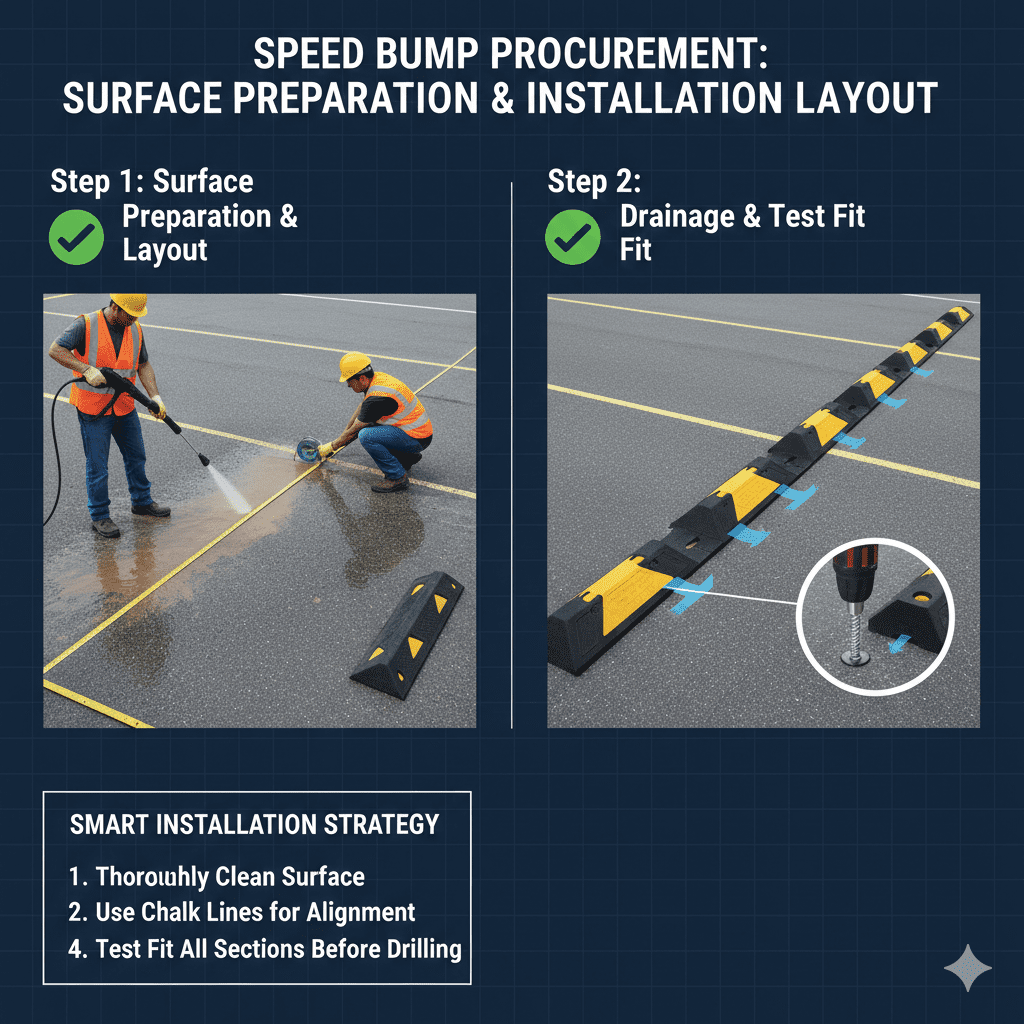
Proper surface preparation ensures secure adhesion between speed bumps and substrates while creating conditions supporting long-term installation integrity. Preparation begins with thoroughly cleaning installation areas removing dirt, oil, debris, and loose material that might prevent proper contact between rubber bases and pavement surfaces. Power washing provides most effective cleaning for outdoor installations, though broom sweeping combined with degreasing solvents adequately addresses less contaminated surfaces. Organizations should not skip cleaning steps despite time pressures, as inadequate preparation creates weak bonds that allow displacement or create gaps permitting water infiltration causing substrate deterioration.
Installation layout using chalk lines or paint establishes precise positioning ensuring perpendicular alignment to traffic flow and proper spacing for multi-section installations. Careful layout prevents crooked installations that appear unprofessional and may create uneven speed reduction characteristics across roadway widths. Layout procedures should measure multiple reference points verifying parallelism rather than assuming single-point measurements ensure proper alignment across entire installation lengths. Professional installers understand that five minutes of careful layout prevents installation errors requiring complete removal and reinstallation if misalignment becomes apparent only after mounting completes.
Drainage considerations affect positioning decisions particularly in areas experiencing significant rainfall where speed bumps create dams impeding natural water sheet flow across pavement. Many rubber speed bump designs incorporate drainage channels allowing water passage beneath or through units, though these channels only function effectively when installations account for natural drainage patterns. Installations perpendicular to drainage flow with channels aligned to water movement preserve drainage function, while installations blocking drainage without adequate channels create ponding that accelerates pavement deterioration and potentially creates ice hazards during freezing conditions.
Test fitting before drilling verifies that planned positioning provides desired coverage and that modular sections align properly creating continuous speed reduction across full roadway widths. Organizations installing multi-section systems should lay out all components verifying proper fit before committing to permanent mounting, as minor dimensional variations or layout errors might prevent proper section mating if discovered only after drilling anchor holes. This verification step takes minutes but prevents hours of remedial work correcting preventable errors.
Installation Procedures and Quality Control
Drilling anchor holes represents the first irreversible installation step requiring precision ensuring holes align with speed bump mounting points and penetrate to proper depths for specified fastener types. Drill operators should use sharp bits appropriate for substrate types, maintaining perpendicular orientation preventing angled holes that compromise fastener grip. Hole depth should match or slightly exceed fastener embedment requirements allowing full fastener seating without bottoming out against hole depth before achieving proper tightness. Organizations should verify hole dimensions using sample fasteners before drilling all mounting points, confirming that holes provide adequate grip without excessive looseness allowing movement.
Fastener installation follows systematic patterns ensuring even compression across full contact areas rather than creating stress concentrations from uneven tightening. Installers should start fasteners in all mounting holes before fully tightening any individual fastener, allowing minor position adjustments accommodating slight dimensional variations before permanent commitment. Final tightening should proceed using torque wrenches set to manufacturer specifications, creating consistent retention force across all mounting points rather than the variable results that “tight enough” judgments produce. Under-tightening fails to achieve adequate grip while over-tightening can damage substrates or strip fasteners, making proper torque control essential for installation quality.
Section alignment for multi-piece installations requires attention ensuring that adjacent sections mate properly without gaps or height mismatches creating tripping hazards or uneven vehicle crossing experiences. Quality installations position sections tightly together using built-in connection features that many rubber speed bump systems incorporate. Slight gaps between sections prove acceptable and may actually benefit drainage and thermal expansion accommodation, though gaps exceeding 1/4 inch suggest alignment problems requiring correction before final fastening commits installations to problematic configurations.
Post-installation inspection verifies that all fasteners achieved proper tightness, sections align correctly, drainage channels remain unobstructed, and finished appearance meets professional standards. Inspectors should physically test each mounted section checking for movement indicating inadequate fastening, verify that reflective striping remains intact and properly positioned, and confirm that any supplementary pavement markings or signage deployed appropriately. Photographic documentation of completed installations provides records useful for maintenance planning, warranty claims if premature failures occur, and liability defense if accidents happen and installation quality becomes questioned during investigations.
Maintenance Procedures and Long-Term Performance
Establishing maintenance schedules immediately following installation ensures that ongoing attention preserves the performance and appearance that initial investments created. Quarterly inspections should verify fastener tightness, check for material degradation or damage, clean surfaces maintaining optical clarity and appearance, and assess whether drainage remains adequate or whether debris accumulation requires attention. Organizations should assign specific maintenance responsibility rather than assuming someone will naturally attend to speed bump care, as diffused accountability reliably results in neglect regardless of initial intentions.
Fastener retightening represents the most common maintenance intervention, as vibration from repeated vehicle crossings gradually loosens mounting hardware even when originally installed to proper specifications. Annual retightening using torque wrenches prevents progressive loosening that eventually allows speed bumps shifting position or developing gaps beneath sections concentrating stresses leading to accelerated deterioration. The modest labor investment in systematic retightening extends service life substantially beyond what neglected installations deliver, making proactive maintenance genuinely economical rather than optional attention that budget constraints might justify deferring.
Damage assessment and timely repair prevent minor issues from developing into major failures requiring complete replacement. Small cracks, worn reflective striping, or localized damage often prove repairable through targeted interventions costing far less than complete speed bump replacement. Organizations should maintain relationships with suppliers who can provide replacement sections or repair materials, ensuring that damaged units receive prompt attention rather than remaining in deteriorated condition compromising safety and appearance until scheduled replacement budgets become available.
Professional rubber speed bump installation in commercial facilities represents straightforward but detail-dependent work where careful planning, proper execution, and ongoing maintenance combine to deliver reliable long-term performance justifying initial investments. Organizations following systematic installation procedures and establishing appropriate maintenance programs consistently achieve superior outcomes compared to those treating speed bump installation as simple commodity work requiring minimal expertise or ongoing attention beyond initial deployment.
Looking for a Custom Speed Bumps Manufacturer or Supplier? Struggling to find the right factory to bring your vision to life? We’ve got you covered! At our place, we craft top-quality Speed Bumps with precision and care. Big or small, your needs are our mission. Let’s launch your Speed Bumps project and take your product line to the next level! Click here to contact